How to run karma in TeamCity on Windows server

This is one solution and it works for us, there is also a node and npm plugin for TeamCity that I did not try, it is found here https://github.com/jonnyzzz/TeamCity.Node.

Setup nodejs, npm and karma for TeamCity on Windows server.

Install nodejs

Install nodejs for windows using the latest installer from https://nodejs.org/en/download/

Configure npm global

To be able to call karma and npm from TeamCity command line build step you need to
update the global catalogs for npm (as described in this post http://stackoverflow.com/questions/7300132/how-to-use-npm-with-node-exe/9366416#9366416)

Create the global (admin) location(s) for npm modules
“C:\ProgramData\npm-cache” – npm modules will go here
“C:\ProgramData\npm” – binary scripts for globally installed modules will go here
“C:\ProgramData\npm\node_modules” – globally installed modules will go here
And set the permissions appropriately
administrators: modify
authenticated users: read/execute

Run the following npm commands in a command prompt
npm config –global set prefix “C:\ProgramData\npm”
npm config –global set cache “C:\ProgramData\npm-cache”

Add npm and nodejs to your System’s Path environment variable

From the GUI, in “Control panel” search for “advanced system setings” open it and select “Environment variables” or run “sysdm.cpl” from cmd to open the “System Properties”
Add the following to PATH: “;C:\Program Files\nodejs\;C:\ProgramData\npm”

Install karma-cli in “C:\ProgramData\npm”

Run the command “npm install karma-cli -g” and verify that i is installed in  “C:\ProgramData\npm”

Install PhantomJs (Optional)

(phantomjs will be downloaded and installed in each build folder if it is not found locally)
Download the zip-file for Windows http://phantomjs.org/download.html
and extract to “C:\PhantomJs\bin\phantomjs” (create the path)

For npm to find phantomjs in a TeamCity build step,
add the path “C:\PhantomJs\bin\phantomjs\bin\phantomjs.exe” to a new environment variable PHANTOMJS_BIN (created in “Environment variables” )

Restart the TeamCity service just to be sure.
To run the karma tests

Save the TeamCity reporter in your project (read this http://karma-runner.github.io/0.13/plus/teamcity.html)
by running the command “npm i –save-dev karma-teamcity-reporter”

Add two command line build steps to your build.
first one containing the command “npm install” – to update/install your “node_modules”
and the second containing the command “karma start –reporters teamcity –single-run –browsers PhantomJS –colors false”

And now you should have a great karma 😉

Happy building!
//Jimi
How to use Visual Studio 2015 with latest nodejs npm

Problem – Visual Studio uses an old version of npm

When running “npm install” using npm version 2 (npm2) the node_modules dependency graph can (will) cause the path/file tree to grow beyond the path length allowed in Windows.
One example of error messages that can hit you in VS is from the RazorGenerator.MSBuild “Illegal characters in path.”
I found that updating this from 2.2.6 to the latest 2.4.3 solved the particular problem in one project but lead to other problems in another project where other nuget packages needed to be updated due to the update of RazorGenerator.MSBuild

Solution – install the latest version of npm and make Visual Studio use it

node version 3 (npm3) has solved the problem with deep paths, https://docs.npmjs.com/how-npm-works/npm3, and therefore the simplest solution is to use this version in VS, I do not know why VS has not updated to this version but since it is a Windows developer tool aiming hard on the open source arena I am stumbled on why an important “fix” like this is not packaged in an update already.

How to

Install nodejs for windows

Using the latest installer from here https://nodejs.org/en/download/, it is as simple as point and click 🙂

Upgrade npm to latest version

At the time of writing the nodejs installer uses an older npm version and that´s why you should update npm by using “npm-windows-upgrade” (more information can be found here https://www.npmjs.com/package/npm-windows-upgrade)

The short install instruction is
Start powershell as administrator
Run the command “Get-ExecutionPolicy” – to see what your base line setting is (probably Restricted)
Run the command “Set-ExecutionPolicy Unrestricted -Scope CurrentUser -Force” – to allow the upgrade
Run the command “npm install –global –production npm-windows-upgrade” to install the upgrader
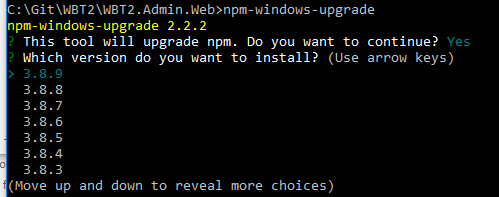
Run the command “npm-windows-upgrade” to upgrade
and select the latest version by just hitting enter.

npm-windows-upgrade

And optionally run the command “Set-ExecutionPolicy Restricted -Scope CurrentUser -Force” – to set the policy back to the former setting, using the value from the first “Get-ExecutionPolicy” (probably Restricted).

Point Visual Studio to the latest npm version

Add the nodejs path to Visual Studio to use the latest npm (thanks to mr James for pointing it out, http://jameschambers.com/2015/09/upgrading-npm-in-visual-studio-2015/)

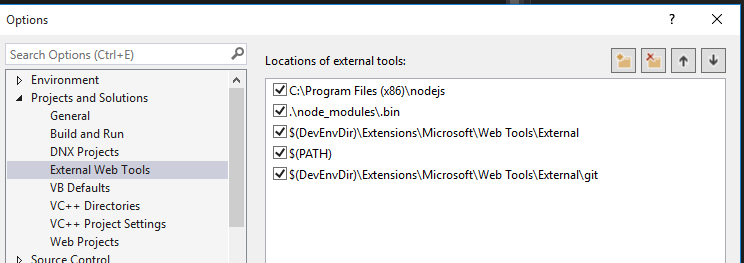
In Visual Studio quick search find “External Web Tools”
and Add a new tools location path where the path points to the nodejs folder from the first step, “C:\Program Files\nodejs” or “C:\Program Files (x86)\nodejs” unless you made any changes, and move the location to the top.

VS-ExternalWebTools

Restart VS (not sure if it is needed but it´s probably best anyway)

If you have a project with a current node_modules folder created before the npm upgrade, then delete the node_modules folder before you open the project in VS to avoid annoying errors.

And now the VS build should work.
If you already had a node_modules folder you can see that the new folder has a lot more sub folders, because more of the dependencies are installed in the “root” now.

Happy coding!
//Jimi

Localhost backend debugging from android device in visual studio, a beginners mistake

cordova azure api debugging on localhost throws error “Failed to load resource: net::ERR_CONNECTION_REFUSED”

Summary:
No! your phone will not connect to your computer through the usb when debugging from Visual Studio using the “device” option.

Scenario: A simple getting started Cordova app with azure backend. Using Visual Studio 2015 and Visual Studio Tools for Apache Cordova. https://azure.microsoft.com/sv-se/documentation/articles/app-service-mobile-cordova-get-started/

Adding push notifications. https://azure.microsoft.com/sv-se/documentation/articles/app-service-mobile-cordova-get-started-push/

Story:

I have been banging my head for a couple of days and cold not figure out what was wrong. When connecting to my backend in Azure the app was working correct, but not when running locally for debugging.

When searching www.stackoverflow.com and googling for the error I got “Failed to load resource: net::ERR_CONNECTION_REFUSED” I got lured away into believing this was related to Cross-origin resource sharing (CORS).

Continue reading Localhost backend debugging from android device in visual studio, a beginners mistake

How to configure chutzpah paths to find the files in a different project than your test project

Why I wrote this post? Well.. I hope to save a couple of hours for you my friend 😉

I´m using Visual studio 2013 and the chutzpah plugin with jasmine to test my angularjs code and I struggled for hours to get the tests running in the Test Explorer, it all turned out to be a problem with getting the references correct.

How to configure chutzpah paths to find the files in a different project than your test project.

It took some effort for me to find out, the documentation in the links below for how to configure the paths is not realy showing exactly how to (or I couldn´t find it), so I want to share my solution.

http://chutzpah.codeplex.com/wikipage?title=Chutzpah.json%20Settings%20File
http://chutzpah.codeplex.com/wikipage?title=Chutzpah%20File%20References&referringTitle=Documentation
https://github.com/mmanela/chutzpah/wiki/Tests-setting

Prerequisites (if you use Visual Studio)

  1. Visual studio (2013)
  2. Node.js (Windows installer) –
  3. Chutzpah Test Adapter and Runner installed (download the files and let visual studio run them for installation)
    Chutzpah Test Adapter for Visual Studio
    Chutzpah Test Runner Context Menu for Visual Studio
  4. Jasmine.js installed in the test project (preferably via package-manager (Install-Package JasmineTest))
  5. A Solution with at least two projects (of which one is for tests)
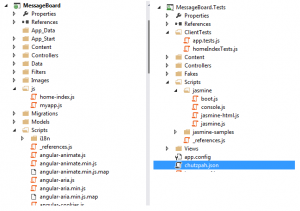
    In my case “messageboard” and “messageboard.tests” from the Pluralsight course “Building a Site with Bootstrap, AngularJS, ASP.NET, EF and Azure
    messageboard-project-folders

Since I´m a bit lazy and don’t want to write to much code I use the _references.js file from my application project in the testfiles (I know this might not be the best way to do and wouldn´t do it in production)

Do read these articles for the story behind _references.js and how it works in VS 2013, they are short and valuable. http://madskristensen.net/post/the-story-behind-_referencesjs and http://blogs.msdn.com/b/microsoft_press/archive/2013/11/07/from-the-mvps-script-references-in-visual-studio-2013.aspx


First; a working solution without chutzpah.json

Here are the paths included in the clienttests/testfile.js
And the tests run when no chutzpah.json file is configured
/// <reference path=”../scripts/jasmine.js” />
/// <reference path=”../../messageboard/scripts/_references.js” />
/// <reference path=”../../messageboard/js/home-index.js” />

(Note that the path to jasmine.js is NOT needed in the chutzpah.json configuration file)


Next; trying to use the chutzpah configuration

when trying to include the _referenses.js in chutzpah.json I couldn´t make it work.
I tried to move the json file around to different folders and also set the “RootReferencePathMode” with no result

This configuration doesn´t work
{
“Framework”: “jasmine”,
“RootReferencePathMode”:”SettingsFileDirectory”,
“References”: [
{ “Path”: “../messageboard/scripts” , “Include”: “_references.js”},
{ “Path”: “../messageboard/js”, “Include”: “*.js” }
],
“Tests”: [
{
“Path”: “clienttests”
}
]
}

And gives the following error (which means that angular.js or angular-mock.js is not loaded):

ReferenceError: module is not defined
at Suite.<anonymous> …

This doesn´t work either (and gives the same error)

“References”: [
{ “Path”: “../messageboard/scripts/_references.js”},
{ “Path”: “../messageboard/js/home-index.js” }
]

my messageboard/scripts/_references.js looks like this
/// <reference path=”angular.js” />
/// <reference path=”angular-route.js” />
/// <reference path=”angular-mocks.js” />

so I thought it might be something with the paths not being interpreted correctly, but when I tried to do like this it didn´t work either so I reverted.
/// <reference path=”../messageboard/scripts/angular.js” />
/// <reference path=”../messageboard/scripts/angular-route.js” />
/// <reference path=”../messageboard/scripts/angular-mocks.js” />

And I ended up with the references to the real files instead (perhaps the best way to do it?), and I put the chtuzpah.json file in the root of my test project.

A working configuration

This configuration work (note that it also works without the RootReferencePathMode when the chtuzpah.json file is in the root)

{
“RootReferencePathMode”:”SettingsFileDirectory”,
“Framework”: “jasmine”,
“References”: [
{ “Path”: “../messageboard/scripts/angular.js”},
{ “Path”: “../messageboard/scripts/angular-route.js”},
{ “Path”: “../messageboard/scripts/angular-mocks.js”},
{ “Path”: “../messageboard/js/home-index.js” }
],

“Tests”: [
{ “Path”: “clienttests” }
]
}

Semesterkalkylatorn – beräkna din semesterersättning och antal intjänade semesterdagar

Semesterkalkylatorn beräknar antal intjänade semesterdagar samt intjänad semesterersättning för en angiven tidsperiod

Du behöver endast ange startdatum, slutdatum, berättigat antal semesterdagar per år samt månadslön för att få fram hur många semesterdagar du tjänat in under perioden samt hur mycket din semesterersättning per dag och totalt blir.
För anställda som inte har kollektivavtal eller har en rörlig lönedel gäller andra beräkningsmodeller. Du hittar mer nyttig info på Unionen

Just nu blev det ett Excelblad för denna beräkning, men den kommer troligen snart som en webbsida när jag tagit mig tid att göra den 🙂

Nu finns Semesterkalkylatorn.se där du kan beräkna semesterdagar och semesterlön.


OBS! Du måste ha en svensk version av Excel för att kalkylen ska fungera.

Ladda ner Semesterkalkylatorn

referenskällor:

http://www.riksdagen.se/sv/Dokument-Lagar/Lagar/Svenskforfattningssamling/Semesterlag-1977480_sfs-1977-480/

http://www.verksamt.se/portal/web/guest/driva/anstalla-personal/franvaro/semesterledighet

http://www.unionen.se/rad-och-stod/om-semester


Powershell Script to add home folder path in Windows 2003 AD on users in list of email addresses

So you need to assign and create home folders to a bunch of users and don´t really feel like doing it all the GUI way one by one?

I had this problem and I also needed to specify what users to create folders for by a list, and since email addresses are a good primary key I based my script on that.

This script will create folders, set permissions and update this information in the user objects in AD

First do Read

In Microsofts “How to assign a home folder to a user” you will find out how assign home folders in GUI or by scripting. When assigning a home folder in AD Users and Computers the AD takes care of creating the folder on specified share, but when assigning a home folder using the scripts they provide all you get is the path mapped in the users computer and in the AD user object, the folder is not created.

Then do Read

This script needs the path to a text file with the users email addresses** (one address per line), domain name,path to root of user share and a drive letter to the home folder (use a “high” one so you don´t get problems with card readers etc.).

** Can easily be changed to display name or samaccountname

! The script will set the users home folder name to “samaccountname_givenName-sn” (f ex. “jifr_Jimi-Friis”)


Powershell Script to add home folder path in Windows 2003 AD on users in list of email addresses

Script to add path to home folder in Windows 2003 AD

Then do Copy modify and enjoy! as always on your on risk 🙂

##***************************************************************************
## ***** Script Header *****

## File Name:  AD_getUserLogonName_fromList_CreateAndSetHomFolder.ps1
# Author : Jimi Friis, www.newsweb.se
# Created: 2012-06-05
#
# Purpose:  Set up home folder for Active Directory users specified as email adresses in a text file
# Continue reading Powershell Script to add home folder path in Windows 2003 AD on users in list of email addresses

Sharepoint Server 2010 Backup Errors “Cannot open backup device” when using Admin GUI

So I tried to use the backup function in Sharepoint Server 2010 (Standard) and it looked pretty straight forward.

Just go to “Central Administration > Backup and Restore”
choose full Farm backup and add the path where to backup, \\SERVERNAME\BACKUPSHARE, and press the backup button.

Wait a minute or two for the preprocessing..

First error:

“This page contains one or more errors. Fix the following before continuing:
Directory\\SERVERNAME\BACKUPSHARE does not exist or the SQL Server service account and the Continue reading Sharepoint Server 2010 Backup Errors “Cannot open backup device” when using Admin GUI

samsung vpn anyconnect mobile error on samsung galaxy tab

Samsung AnyConnect Mobile error on samsung galaxy tab

the error says: network state information is needed to complete initialization please enable networks and restart the application

this only happens before a first vpn profile is added tho anyconnect

Solved,

the solution is to enable the wireless (wifi) network, even though you are not connected to a wifi network the anyconnect client will work, at least it did on both devices i had problem with.

Android version 3.1 (2.6.36.3)

Galaxy Tab GT-P7500

Samsung (< SEP20011) AnyConnect Mobile

Script to Uninstall Eset Nod32 and install Forefront Endpoint protection from GPO

How to uninstall Eset Nod32 Antivirus and install FEP (Forefront Endpoint Protection) also known as Microsoft Essentials Antivirus on Windows clients using a vbscript.

In my environment we have been using Eset Nod32 Business Edition antivirus version 4.

Nod32 is a light and stable antivirus with a decent footprint. The Eset Administration is good and powerful if you spend a couple of days learning it.

But!.

Wen we started to use a business web application, using the java editor PageFlex .EDIT, from our business partner www.webtopsolutions.se our users complained on that editing tool system, and it was really slow, loading the page in about 40 to 50 seconds, and editing was really slow with 1 to 2 seconds per key stroke .

After some troubleshooting we found that Nod32 was the reason and for some reason there is no way to exclude a web site from the antivirus, there is a setting to exclude URLs from scanning but the URL will still be processed by Nod32 in some way. One possible option is to disable the scanning of web pages completely, but that was not an option I liked.

The quick fix on this problem is to change antivirus to FEP wich is free at least if you have a subscription from Microsoft, else there is the essentials version.

To manage and install FEP you have two options, one is to use System Center 2012 Endpoint Protection (or SCCM) and it requires SQL Server Standard or Enterprise editions. The other option is to install the client manually or by script and use GPO settings to mange the client settings.

This is how I install the FEP client using a GPO user logon script, making sure that Nod32 is uninstalled before installing. It is tested on Windows XP and Windows 7, x86 and x64.

Wen running the script on my Windows 7 the UAC popped up, I haven´t tested if that happens when the script is run by the GPO, so you might need to test it and tell the users if the prompt will  pop up.

Thanks to Jakob Gottlieb Svendsen, http://blog.coretech.dk/jgs, for providing a nice start to this script.

I hope this will be of help, and don´t forget to turn off the password protection in Nod32 or the uninstall will fail.


Use this script at your own risk and test it before deploying to production environment.

Continue reading Script to Uninstall Eset Nod32 and install Forefront Endpoint protection from GPO